Hi,
when we are done with clearing the old pond stuff, it is time to build the new pond. For building our new pond we had to create the retaining wall. The reason for it lies in the soil. Our soil contains a LOT of sand, so you cannot compact it. It is not stable – therefore we had to add the retaining wall. Here is the process of how we made our small pond. in case of big ponds, you will have to make the retaining wall in its final position. or you can make smaller parts of it, then connected them to the final layout on site.
Building the retaining wall – optional
This is optional step in the building of new pond, but for us was crucial. As I mentioned, our soil is sandy, so we need to make something to keep the soil away from our pond. I also wanted to slightly raise the pond edge, also to keep the soil and mulch out of the water. There are many ways to build the retaining wall, and we chose to use wood. Wood was a good choice for us wince we are not allowed to use a lot of concrete in the garden, plus since we have no car at the moment, wood is much easier to transport for us.
Needed materials for retaining wall
boards
impregnated wooden stakes (like for fence) at least 10 cm (4″) longer then the height of the retaining wall
Before buying materials make sure to measure your pond then calculate the materials. I calculated the approximate circumference of the pond to be 6 m. To make the retaining wall we reused the wood from the packaging that the office white board came in. It was the perfect size to make a 5 sided pond – pentagon pond. With 4 sides equal in size and 1 shorter. Since the package consisted of 7 boards that were 124 cm long and two 198 cm long boards, I could get the circumference to almost a bit more then 6 m. The short boards I didn’t have to cut, I only had to cut the two long boards. I cut one long one to the length of the other small boards and halved the other long board.
Tips on buying the wood
Here we are doing the pond that is not raised above the ground. So we are pretty confident that we can use rather thin boards to hold the water. The soil will be providing extra strength to the bards themselves. But if you want to build a raised pond. I would suggest to use u thicker boards, and even railway slippers, cause you need to make sure that the wood will withstand the pressure. Other option for raised wooden pond is to build the retaining wall from concrete blocks and then clad them to the wood of your choice. However you choose, the ponds build with concrete blocks will always be more permanent then the ones built with natural materials.
Assemble the retaining wall
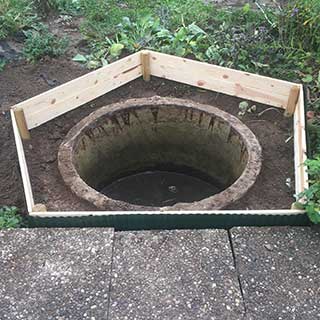
To assemble the retaining wall on a flat surface we first arranged the first layer of boards to for the shape we wanted. That way we could approximate the angles in which we will drill the boards to the stakes. Then we put the stakes up side down in the corners, and started with connecting the boards to the stakes, making sure that the shape and angles are correct.
After the first layer of boards we simply added the second layer of boards, so out retaining wall was now a box with 20 cm (8″) high sides. And the retaining wall was done!


Set the wall to final position
We now had to flip our wall and then move it to its final position. Since our wall was not heavy two of us were enough muscle power. We carefully flipped it, so that stakes are pointing down, and then carefully moved it to the position. The good thing about small ponds is that you can actually try several positions of the retaining wall box to determine the best look.
When we (read I) were happy with the position, we pushed the stakes to the ground and leveled it out using a level. To protect the wood bit from soil and mice, we surrounded the wall with the plastic edging. Then we secured it with some extra soil. And our retaining wall was done.
Options for the retaining wall
You can build your wall from wood, like we did, or from concrete. I would prefer to build it with concrete blocks, but as I mentioned, we have a restriction regarding the use of the concrete. If you have a clay soil, you can even omit it all together, by actually compacting the soil using compacting tools. For us, it wasn’t an option.
Coming up!
In the next part we will cover our pond with the pond liner and fill it in. Don’t miss it!