Hi,
our little garden is slowly starting to take shape. The overgrown plants are now subdued, and the new hedges and topiary are slowly growing. For the second year of our garden, I want to create the flower borders surrounding the round lawns. This will take a bit of time and patience but even in its first year, these borders will pack a punch.
Measure the area
The first thing to do is to decide where and how will the borders look. To do this first measure space where your borders will be. Measure that entire part of the garden, not just the border area. It is important to make a precise sketch of the lawns/patio and borders surrounding them.
Decide the form of flower borders
When the area is measured and you have sketched it on the paper, you should think about the form they will have. For me, it was easier to think about the form that the lawn is going to have. I really liked the way that round lawns look, so I decided to have the round lawns surrounded by flower borders that look like spikes. Since the area is pretty big, I can have up to 4 interconnected circle lawns.
Divide and conquer
Dividing the bigger areas into smaller ones allows me to think about each particular lawn/patio part as a separate room. This way the garden gets more interesting and looks bigger. The only thing is that you have to be careful not to break the space too much. So in terms of size, think about what you will use this space for. Will it be a quiet place with the contemplation area? Will it house a greenhouse or cold frame? Can this place have a nice view of some other area in the garden? Would you like to have a seating area with a table or just a bench? These are all things to think about. When you have determined how you use the garden or these parts, it is time to start sketching the borders and spaces.
The power of empty space
Even though you might be compelled to make the borders as big as possible or to cramp as many things into a single area as possible. Remember, sometimes a pause is the most dramatic piece of the play. Pause in dance, music or drama is the most powerful expression of emotion, not lack of emotion. Allowing us to understand the emotions, what is happening and to ground our selves. And pause in the gardening terms is an “empty space”. Space without any decorations and simple planting of one grass or a hedge surrounding it may be just the right thing in that particular spot. Sometimes the most powerful statement is the most subtle one.
Decide the colour scheme
The next step into creating any border is to think about the colour scheme that we want these borders to have. And it can depend on whether or not you already have some plants. The choice of colours is yours.
There are a lot of theories about colours and colour combos. But it doesn’t mean that you need to stick to them. A garden or garden border can have in it as many colours as you want. However, if you want to follow some designer tips, here they are:
- choose contrasting colours – purple or violet and yellow, orange and blue, red and deep green (i.e. red flowers with a lot of evergreens)
- choose one main colour and plant only flowers in that colour – red, or yellow, or blue …
- plant flowers in the same colour family – light yellow up to dark yellow flowers, light red to dark red, all tones of violet, all tones of blue…
Imperfection makes perfect
Ok, so you chose your colours, but you may have a spot or two where there are no plants in that colour that will thrive there – wrong ph of the soil, a patch of deep shade, too much clay, or too much sand … Or it simply looks a bit to uniform and boring. You can always add pops of one colour here and there, that will act as a focal point in otherwise row of uniformity. The little bits of odd colour may just give the “umpf” and personality to the borders. So if a plant pops up in the “wrong place” don’t pull it out right away. Stand back, take a second look. Maybe it is just where it’s supposed to be.
Mind the leaves
The great design of borders does not only mind the colour. You should also think about the shapes of the leaves. If you plant only the plants with small leaves nothing will be able to pop. It will look a bit bland and boring. The contrast between small and big leaves can be quite interesting, and can even make interesting shade plays in certain light.
Also, leaves have their colour, so make sure to mind that as well when choosing plants. I like to include plants with dark leaves as well as the leaves that are light in colour. They make a statement in the border and serve as a focal point, or may provide the contrast for a flower that would be lost otherwise. So think about the leaves. Leaves are great!
Don’t be afraid of the green
If you want, you can completely omit the flowers. Do a border or garden with only leaves. That can be just as exciting and awesome as a border full of flowers. And in case of hay fever can actually enable the person with the allergy to enjoy the garden as well.
Combining into design
As a conclusion, I will give you a couple of designs I am thinking about. The plants in the borders will be yellow and pink with pops of blue. I will also add veggies and fruit to the borders between the flowers. This will allow me to grow more produce. Since I really like circle lawns I will use them in my designs, the rest of the garden is in square shapes, this will give a bit of interest to the garden when viewed from the top. Without further ado, here are the designs.

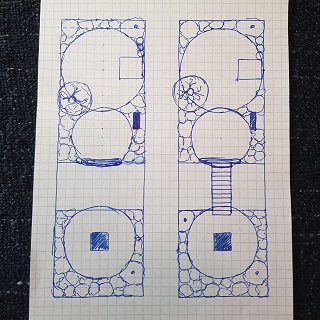
Designs 1 & 2 
Designs 3 & 4
In all designs, I featured the same area of my garden. This area is accessible on the left of lawn 1 in all of the designs. The lawn is completely adjacent to the path that runs on its left side. It also had a small green house that is marked with letter “g”.
Lawn 2 in the designs 1, 2 & 3 has willow moon gate that is leading to the lawn 3. It also has a bench on the right side that had the view of the pond that is situated on the other side of path that runs on left. Design 4 has no moon gate.
Designs 1 & 2 have a square lawn as lawn 3 that is stretching over the entire width. This is our “pause”. It lets the design “breathe”, and may make the lawn 4 and the borders around it feel further away than they are.
Lawn 3 on the design 3 is just a circle lawn like all the others. And on design 4 this lawn is actually a fake elliptic “pond”. It can also be a real pond with the bog garden around it, and the bridge across. But I envisioned it as an area filled with creeping plants like phlox or creeping thyme or something similar.
Lawn 4 is again a simple lawn area with a gaming table in the middle. This table offers a focus point when looked at from other areas, but has a practical function for playing cards and board games as well. No one said you can’t have fun in your garden.
The design we decided to go with is design 1. We really liked that “pause” that is lawn 3. Currently, we are even thinking about planting some high grasses in that area so that it resembles a field. But this will be sometime in the future. We may then switch to design 2, with an added bridge through the sea of grasses. We shall see…
One last tip …
Do NOT go crazy with buying fully grown plants, or heaps of perennials that you might use. Start your borders with annuals. They will allow you to change the colour scheme if you don’t like it. And think about where you will want bigger plants. Then slowly start filling the borders with perennials thus omitting a lot of replanting. Some replanting will always be necessary. You can also grow your own plants from seeds, this will allow you to have more plants for a fraction of the cost. Whatever you do enjoy the process and allow it time.