
Hi,
so we, mostly I decided to give our old pond revamp. It needed it. The liner was leaking everywhere and was brittle. The pond did not have any retaining walls around the outer rim and its walls were pretty steep. So there were tons of problems with this pond. In this series, I will give you tips on how to tackle an old pond and give it old life.
Related Posts


Blackberry trellis – Sprucing up the blackberry area
May 23, 2020
Old Pond to New Pond – Part 2 – Building New
Nov 7, 2019
Herbwall – fresh herbs in small space
May 11, 2018When to clear the old pond
The biggest problem for us was the fact that we had a lot of frogs using our pond. Even though our pond was deep and without any shallow areas, frogs still liked to visit it. They did not reproduce in it, it was just one of the ponds they visited. The good thing about this pond and the dept was that it never dried out.
So in order to make the least amount of problems for our wildlife guests, we had to choose the time of the year when the wildlife was not using it. It ended up being the middle of October. We started slowly getting materials and other stuff delivered to the garden. When the time was right and the temperatures were not too cold. We started to clear the pond.
In short: time to clear the pond is when the temperatures are not freezing and there are no frogs in the pond. The middle of October is just right.
Clearing the pond
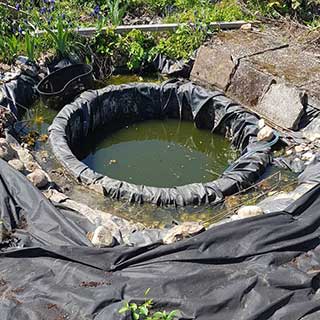
Our pond had an old liner simply put to on the concrete tank and soil. The tank was dug in. So the pond has one shelf and then a steep drop to 1 m (3 ft) dept. Not ideal in any way. The shelf’s liner was also damaged and it was leaking, so in the end, the only practical part of the pond was the deep tank part.
Before starting the clear out I removed our little solar pump from the pond and put it to side in a bucket of water. Then I first cleared the shelf (outer rim). I removed as much of the stones that I could find. And put them in the buckets with water. All the stones that I could find we are going to wash and reuse.
Next, I used the mesh to clear the pond of any oxygenating plants and as much of the bottom silt as possible. During this process, I discovered an old terracotta pot that was left in the pond.
Pumping out the water
When all of the plant material that I could see was removed, we used our garden pump to pump out the water from the pond. We used the water to water the garden and also filled in the buckets, so we can add it back once when we are finished with the pond.
When the pumping was at the end, we stirred the remaining silt with the water and used to pump out as much stuff as possible. When we finished with pumping out we then cleaned the pump by pumping the clean water until the water coming out of the pump did not contain any silt.
The next step was to bucket out as much of the remaining silt as possible. We also found a piece of a concrete pipe that was at the bottom of the pond. We removed that one and also removed the silt that was below it.
Removing the old liner
We pumped out and bucketed out water as much as possible. Then we removed the old liner. First, we folded the liner from one side to the other. Then we pulled it all out on the lawn. In this process, we discovered that the liner had been leaking even in the main concrete tank area, so there was still some water in the concrete tank. We used a bucket and a plastic glass to bucket it out as much as possible.
After this, the pond was finally cleared of old stuff and ready for the new look.

how our old pond looked like when we were starting 
clearing the outer rim was done by hand and a lot of gloves 
we pumped water out with garden pump 
what we found in the bottom before we bucketed as much as we could 
finally cleared pond 
this terracotta pot was found
Some tips
There are some things that we discovered in this process, that I didn’t know before we began. Or at least everybody takes them for granted.
- It stinks.
Even though I read a lot about creating and redoing ponds, nothing prepared me for the smell of it. The silt on the bottom of the pond stinks. It has a sulfurous smell that really sticks to the nose. I suggest breathing on the mouth or holding your breath while you use the bucket to scoop out the water and silt. Then when you straighten up you can breathe in. It will all still be smelly BUT at least you won’t vomit. - Helpers wanted.
Make sure that you have a helper when doing this. The liner is heavy. Even if you are in shape it will be very difficult for one person to remove it. It is clumsy, rigid and heavy. The second thing why you would need an extra person is that during the bucketing of water, it is much easier for one person to stand in the pond and bucket, and the other person can get rid of the water and silt from the bucket. - Have an abundance of rubber gloves.
Rubber gloves are excellent, make sure to have plenty of them. You really don’t know what is in the silt and you should not be touching it with your bare hands. Replace the glove every time your glove is punctured, or you think it is punctured. Better be safe than sorry. And simple garden gloves won’t do the trick. If you have rubber gloves for pond work, then you can use those. Buy a big box of latex gloves and use them all the time while clearing out the pond.
The toughest part of the rebuild is clearing the old material and old liner. The rest is easy.